This guide will walk you through how to easily navigate the vendor dashboard, understand key vendor details, manage your notifications, and set up different rate options.
Step 1: Accessing the Vendor Dashboard
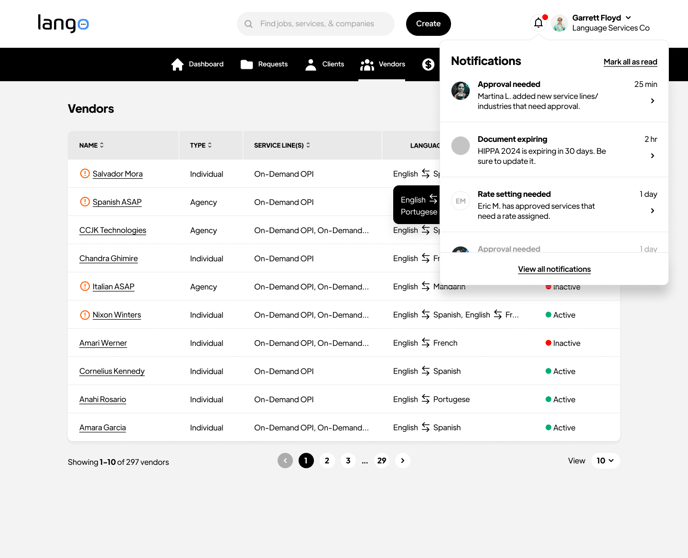
- Select "Vendors" from the main navigation menu.
- The vendor list will show all registered vendors.
Step 2: Understanding the Vendor List
Key Information Columns
- Name: Displays the vendor’s name or agency name.
- Type: Indicates whether the vendor is an Individual Vendor/Contractor or an LSP Agency.
- Service Line(s): Lists the services offered (e.g., On-Demand OPI).
- Languages: Displays the language pairs the vendor supports.
- Status: Shows if the vendor is Active or Inactive.
Step 3: Managing Notifications
Types of Notifications
- Approval needed: New service lines or industries requiring review.
- Document expiring: Alerts for upcoming document expirations.
- Rate setting needed: Services that need rate assignments.
Notification Actions
- Click "Mark all as read" to clear all notifications.
- Select "View all notifications" to see the full notification history.
- Click on individual notifications to take specific actions.
Step 4: Navigation and Views
Pagination
- Use the page numbers to navigate through the vendor list.
- Adjust the number of items per page with the View dropdown.
Search and Filter
- Use the search bar at the top to find specific vendors or services.
- Click column headers to sort the list.
Step 5: Understanding the Rates Dashboard
Key Metrics
- Unpaid Amount: Shows the total amount pending payment.
- Revenue: Displays total earnings for the selected period.
- Active Requests: Number of current service requests.
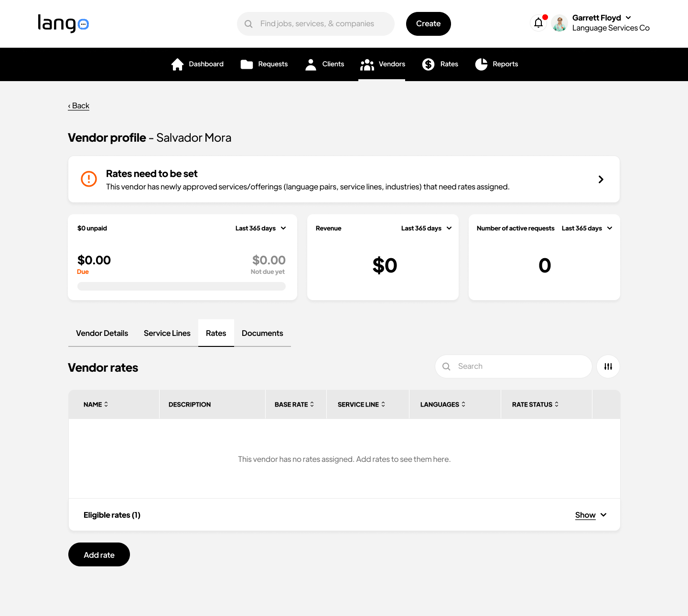
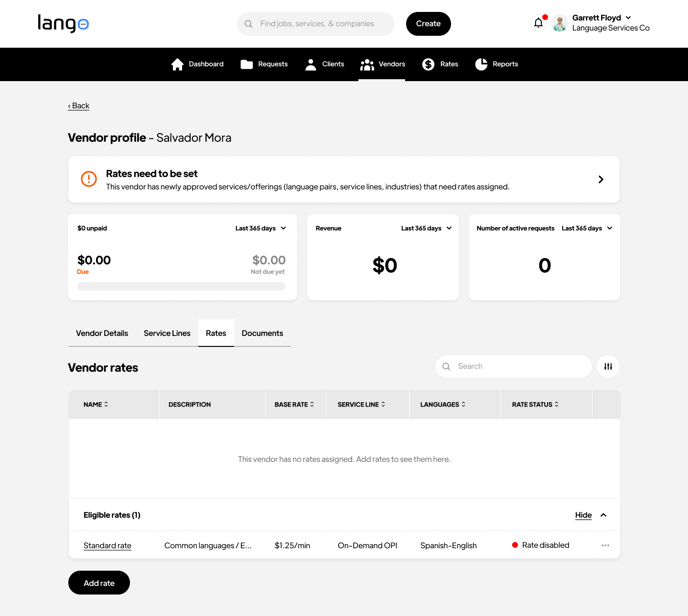
Rate Management Table
Table Columns
- Name: Identifier for the rate entry.
- Description: Details about the service and rate.
- Base Rate: The standard rate for the service.
- Service Line: Type of service provided.
- Languages: Applicable language pairs.
- Rate Status: Current status of the rate (Active/Pending).
Table Actions
- Use the search bar to filter rates.
- Click column headers to sort the table.
- Select "Add rate" to create new rate entries.
- Use "Show" dropdown to view eligible rates.
Rate Notifications
The system will display alerts when:
- New services need rates assigned.
- Rate approvals are pending.
- Rate updates are required.
Step 6: Setting Up Rate Configuration
Follow these steps to configure the base rate settings:
- Enter your base rate amount in the designated field.
- Select the appropriate unit (most commonly "per minute").
- Choose your preferred currency from the dropdown (USD, EUR, etc.).

Step 7: Configuring Rounding Rules
To set up rounding preferences:
- Choose your rounding method (Up or Down).
- Select the rounding increment from the dropdown menu (15 seconds, 30 seconds, etc.).
Step 8: Setting Up Weekend Rates
To configure weekend pricing:
- Locate the Weekend Rates toggle switch and enable it.
- Choose your preferred rate type:
- Percentage increase: Adds a percentage to the base rate.
- Fixed additional rate: Adds a specific amount to the base rate.
- Enter your desired amount in the corresponding field.

Configuring After Hours Rates
For after-hours pricing setup:
- Enable the After Hours Rates toggle.
- Select your preferred rate type (Fixed or Percentage).
- Input the additional amount or percentage increase.
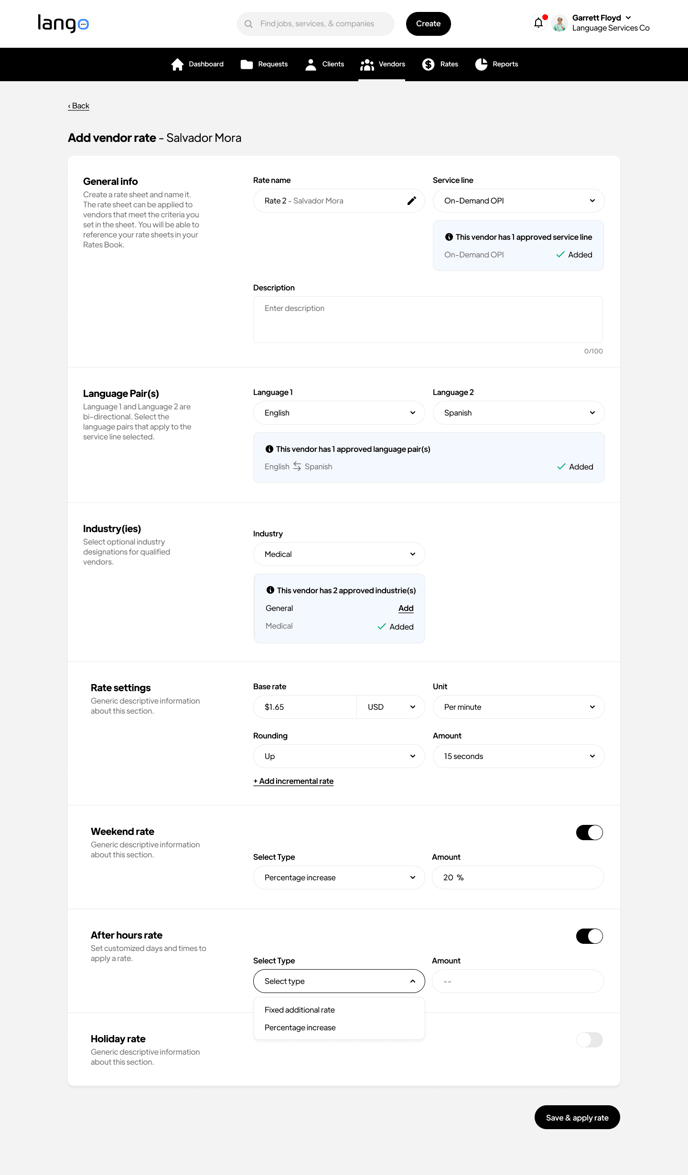
Step 9: Setting Holiday Rates
To establish holiday pricing:
- Enable the Holiday Rates toggle.
- Select which days the holiday rate applies to.
- Set the time range using the From and To fields.
- Choose your rate type (Percentage or Fixed).
- Enter the holiday rate amount.

Additional Rate Options
To complete your rate setup:
- Click "+ Add incremental rate" if you need tiered pricing structures.
- Use "+ Add overtime rate" to set specific overtime rules.
- Review all settings and click "Save & apply rate" to implement your changes.
Note: Remember to review all settings carefully before saving, as these rates will be applied to all future vendor assignments under these criteria.
Need Help?
- If you need further assistance, use the Langston chatbot at the bottom right of the page, or reach out to support.