Welcome to Lango! We’re excited to have you on board. This guide will help you set up your account and get started with our platform. Follow the steps below to complete your onboarding process.
Agency Vendor Creation
This guide will help you create a new vendor in the system. Follow these steps to add vendor details and specify the vendor type.
Step 1: Access the Vendor Creation Interface
- Navigate to the Vendors section of your dashboard.
- Click on the Create New Vendor button.
Screenshot Instructions:

Step 2: Enter Vendor Details
- You will be directed to a form where you can enter the details of the new vendor.
- Fill in the following fields:
- Vendor Name: Enter the full name of the vendor.
Screenshot Instructions:

Step 3: Select Vendor Type
- Specify the vendor type by selecting either Individual or Agency.
- Individual: Choose this option if the vendor is a freelancer or a single person.
- Agency: Choose this option if the vendor is a company or organization.
Step 4: Create the Vendor
- Once you have filled in all the required fields and selected the vendor type, click the Create Vendor button to create the new vendor.
Vendor Profile
Step 1: View Created Vendor Profile
- After creating a new vendor, you will be directed to the Vendor Profile page.
- Here you can view the vendor's profile details and payment information.
Screenshot Instructions:

Step 2: Access Vendor Details from Dashboard
- Navigate to the Dashboard.
- Click on Vendor Details to view a list of all vendors.
- Select the vendor whose details you want to view or edit.
Step 3: View Vendor Details
- On the Vendor Details page, you can see all the information related to the selected vendor.
Step 4: Edit Vendor Details
- To edit the vendor's information, click the Edit button.
- Update the necessary fields such as name, email, address, phone number, etc.
- After making the changes, click the Save button to apply the updates.
Managing Users in Vendor Profile
Step 1: Access Users in Vendor Profile
- Navigate to the Vendor Profile page.
- Click on the Users tab in the dashboard to view and manage users associated with the vendor.
Step 2: View Existing Users
- In the Users section, you can see a list of all users associated with the vendor, including their names, email addresses, and roles.
Screenshot Instructions:

Step 3: Invite New User
- After clicking the Add New User button, a pop-up form will appear.
- Fill in the following details:
- First Name: Enter the new user's first name.
- Last Name: Enter the new user's last name.
- Email: Enter the new user's email address.
- Role: Select Admin from the role options.
Screenshot Instructions:
.png?width=688&height=490&name=Vendors%20-%20Vendor%20Profile%20Page%20-%20Agency%20-%20Users%20Tab%20-%2002%20-%20V2%20(1).png)
Step 4: Send Invite
- Once you have filled in all the required details, click the Send Invite button to send the invitation.
- If you need to cancel the invitation, click the Cancel button.
Service Lines
Step 4: Select Service Lines
- Select the service lines you offer (e.g., translation, interpretation, transcription).
- Check the boxes next to the services you provide.
- Click Save.
Screenshot instructions:

Requests
Toolbar Buttons
This feature allows to export a .csv file of all your jobs and customize the export by filtering and sorting. These buttons are located at the top right of the website.
Screenshot instructions:
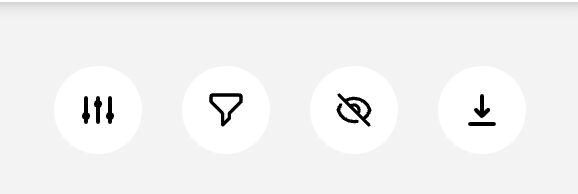
1. Adjust Filters
- Icon: Three vertical sliders.
- Function: Filters the data according to specific criteria (e.g., job type, date, rate).
- How to Use: Click the icon to open the filter menu, select your desired filters, and apply them to modify the view.
2. Apply Sorting
- Icon: Funnel.
- Function: Sorts the data based on selected fields (e.g., by date or job status).
- How to Use: Click the funnel icon, choose a sorting option (ascending or descending), and apply it to rearrange the data.
3. Hide Data
- Icon: Eye with a slash.
- Function: Hides certain data from view without removing it permanently.
- How to Use: Click the eye icon to hide specific rows or data sets. Toggle the button to show the data again.
4. Export Data
- Icon: Download arrow.
- Function: Exports the filtered and sorted data as a .csv file.
- How to Use: Click the download icon to export a .csv file of all your jobs based on the applied filters and sorting.
By following these steps, you can effectively manage and update rates within the vendor profile. If you have any further questions or need additional assistance, please contact our support team.
All Set!
You're now ready to start receiving language service requests on Lango! 🚀